
Have you ever craved a dessert that’s light as a cloud yet deliciously creamy? Let me introduce you to milk jelly dessert, an enchanting treat that’s taken the culinary world by storm.
This Asian-inspired delicacy combines the smooth, velvety texture of milk with the delicate wobble of jelly to create something truly magical.
Whether you’re a seasoned home chef or just starting your culinary journey, this milk jelly dessert will become your new favorite way to end a meal.

What Makes Milk Jelly Dessert Special?
Milk jelly dessert stands out for its perfect balance of simplicity and sophistication. Unlike heavy custards or rich puddings, this dessert offers a refreshing lightness while still satisfying your sweet tooth.
The combination of milk and gelatin creates a unique texture that’s simultaneously firm and melt-in-your-mouth tender. Best of all, it’s incredibly versatile – you can customize it with different flavors, toppings, and presentations to suit any occasion.
Essential Equipment
Before we dive into the recipe, let’s ensure you have all the necessary tools:
- Medium-sized saucepan
- Whisk
- Measuring cups and spoons
- Strainer or fine-mesh sieve
- Serving molds or glasses
- Thermometer (optional but helpful)
- Mixing bowls
- Rubber spatula
Basic Milk Jelly Recipe
Ingredients
- 2 cups whole milk
- 1/4 cup granulated sugar
- 2 packets unflavored gelatin (about 14g total)
- 1/2 cup cold water
- 1 teaspoon vanilla extract
- Pinch of salt
Step-by-Step Instructions
-
Prepare the Gelatin
- Pour cold water into a bowl
- Sprinkle gelatin evenly over the water
- Let it bloom for 5-10 minutes until fully absorbed
-
Heat the Milk Mixture
- In a saucepan, combine milk, sugar, and salt
- Heat over medium heat, stirring occasionally
- Don’t boil; instead, bring to a medium simmer.
- Remove from heat when sugar dissolves completely
-
Combine and Set
- Add bloomed gelatin to the warm milk mixture
- Whisk thoroughly until gelatin dissolves completely
- Stir in vanilla extract
- Strain mixture through a fine-mesh sieve
- Pour into serving molds or glasses
- Keep in the refrigerator for a minimum of four hours or overnight.
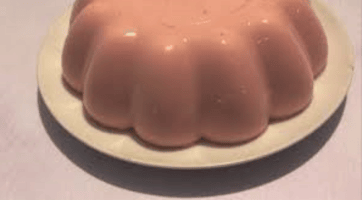
Flavor Variations
Matcha Milk Jelly
Add 1-2 teaspoons of high-quality matcha powder to the warm milk mixture before adding gelatin.
Coffee Milk Jelly
Dissolve 1 tablespoon of instant coffee in the warm milk mixture before adding gelatin.
Chocolate Milk Jelly
Add 2 tablespoons of cocoa powder and an extra tablespoon of sugar to the milk mixture while heating.
Pro Tips for Perfect Milk Jelly
-
Temperature Control
- Milk should be warm but not boiling (around 160°F/71°C)
- Too hot will weaken the gelatin’s setting power
- Too cool won’t dissolve the gelatin properly
-
Texture Management
- For firmer jelly: Use 2.5 packets of gelatin
- For softer jelly: Use 1.5 packets of gelatin
- Always bloom gelatin fully before using
-
Storage Tips
- Keep in the refrigerator for up to 3 days
- Wrap in plastic wrap to avoid the development of skin.
- Don’t freeze as it will affect texture
Troubleshooting Common Issues
If jelly didn’t set properly
Gelatin wasn’t properly bloomed:
1. Milk was too hot when adding gelatin
2. Incorrect gelatin-to-liquid ratio
Solution:
Ensure precise measurements and follow temperature guidelines
If it has lumpy texture
1.Gelatin clumped during blooming
2.Insufficient stirring
Solution:
Strain mixture before pouring into molds
If it has separation issues
1.Mixture cooled too much before pouring
2.Ingredients at different temperatures
Solution:
Work quickly and maintain consistent temperatures
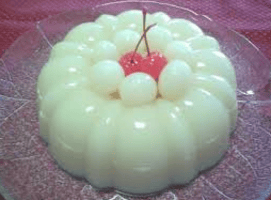
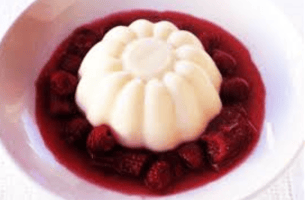
Serving Suggestions
Transform your milk jelly dessert into an elegant treat with these serving ideas:
- Fresh fruit compote topping
- Drizzle of caramel sauce
- Sprinkle of crushed cookies
- Layer with coffee jelly
- Garnish with mint leaves
- Dust with cocoa powder
FAQs
How long does milk jelly dessert last in the refrigerator?
When properly stored in an airtight container, milk jelly dessert lasts 3-4 days in the refrigerator.
Can I use plant-based milk for milk jelly?
Yes, you can use plant-based milk, but you may need to adjust the gelatin amount. Coconut milk works particularly well.
Why did my milk jelly become grainy?
Grainy texture usually occurs when the gelatin is not properly dissolved or when the mixture is heated too quickly.
Can I make milk jelly dessert without gelatin?
Yes, you can use agar-agar as a vegetarian alternative, but the ratio and preparation method will differ slightly.
Is milk jelly dessert healthy?
While not particularly low in calories, milk jelly dessert is lighter than many traditional desserts and provides calcium and protein from the milk.
Can I make milk jelly dessert in advance?
Yes, it’s perfect for make-ahead preparation and actually benefits from setting overnight.
Why does my milk jelly develop a skin on top?
A skin forms due to protein coagulation when exposed to air. Prevent this by covering with plastic wrap while setting.
Conclusion…
Milk jelly dessert represents the perfect intersection of simplicity and sophistication in the dessert world. Whether you’re preparing it for a special occasion or as a weekly treat, this versatile dessert never fails to impress.
The key to success lies in understanding the basic principles and following the steps carefully. With practice, you’ll master the art of creating perfectly set, silky-smooth milk jelly that rivals any professional dessert.
Remember to experiment with different flavors and presentations to make this classic dessert your own. From its humble ingredients to its elegant final presentation, milk jelly dessert proves that sometimes the simplest things in life are truly the most satisfying.