
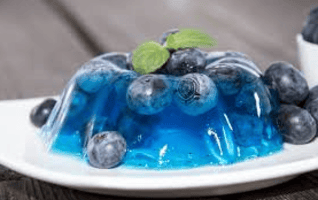
There’s nothing quite like the sweet, tangy taste of homemade blueberry jelly.
With its deep purple color and irresistible flavor, this classic preserve is a perfect way to capture the essence of fresh blueberries and enjoy them year round. Whether spread on warm toast, swirled into yogurt, or used as a topping for desserts, blueberry jelly adds a burst of homemade goodness to any dish.
The best part? Making it yourself is easier than you might think! With just a handful of ingredients and a little patience, you can create a jar of rich, flavorful jelly that’s far better than anything store bought.
Let’s dive into the simple yet rewarding process of making your own blueberry jelly from scratch!

Gathering Your Ingredients
To create this beautiful preserve, you’ll need:
- 4 cups of fresh or frozen blueberries (about 2 pints)
- 3 cups of granulated sugar
- 2 tablespoons of fresh lemon juice
- 1 packet (1.75 oz) of powdered pectin (optional)
When selecting blueberries, look for berries that are firm, deeply colored, and have a slight silvery bloom on their skin. This natural coating indicates freshness and helps preserve the berries. While wild blueberries offer an intense flavor, cultivated varieties work beautifully as well.
If using frozen berries, choose ones without added sugar to maintain better control over the final sweetness.
Setting Up Your Workspace
You’ll need:
- A large, heavy-bottomed stainless steel pot
- A fine-mesh strainer or cheesecloth
- 4-5 half-pint canning jars with new lids
- A candy thermometer
- A large ladle and funnel
- for handling hot jars
- A few small plates in the freezer (for testing consistency)
Blueberry Jelly Preparation Process
Step 1: Preparing Your Berries
Begin by gently washing your blueberries and removing any stems or damaged fruit. Place them in your pot and crush them with a potato masher.
The process is therapeutic each berry bursting, releases its intense color and fragrance, filling your kitchen with the essence of summer.
Step 2: Extracting Liquid Gold
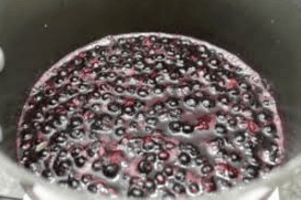
Add 1/4 cup of water to your crushed berries and bring the mixture to a simmer over medium heat. Cook for about 10 minutes, stirring occasionally. The berries will release their juice, creating a vibrant purple liquid.
Strain this mixture through your cheesecloth or fine mesh strainer, allowing it to drip naturally resist the urge to squeeze, as this can make your jelly cloudy.
Step 3: The Transformation
Return 3 cups of the strained juice to your clean pot. Add the lemon juice and pectin (if using). Over high heat, bring this mixture to a rolling boil while stirring continuously.
Add the sugar all at once, continue to stir until the mixture returns to a full boil. Stir continuously while cooking for precisely one minute.
Step 4: The Setting Point
This is where experience and patience come together. To test if your jelly is ready, place a small amount on one of your frozen plates.
After a minute, run your finger through it if the line holds and the surface wrinkles slightly, you’ve reached the setting point. If not, continue cooking and testing at one-minute intervals.
Step 5: Preserving the Magic
While your jelly is cooking, ensure your jars are sterilized and kept hot. Carefully ladle the hot jelly into your prepared jars, leaving 1/4 inch head space. Wipe the rims clean, apply the lids, and process in a boiling water bath for 10 minutes for proper sealing.
Note:
Success in jelly making often comes down to small details. Testing for the proper set point is crucial under cooking results in runny jelly, while over-cooking can make it too firm.
For a more complex flavor profile, consider adding a cinnamon stick during cooking or a splash of vanilla extract at the end. Trust your instincts the process becomes more intuitive with each batch you make.
Storage and Serving
Jars that are properly sealed can be stored in a dark, cool place for up to a year. After opening, store in the refrigerator and use within three weeks.
While perfect on your morning toast or English muffin, don’t limit yourself try it as a glaze for roasted pork, swirled into yogurt, or as a sophisticated addition to a cheese board.
The Health Benefits
Beyond its incredible taste, blueberry jelly carries many of the nutritional benefits of fresh blueberries.
Rich in antioxidants and vitamin C, it’s a delicious way to incorporate some of nature’s most powerful compounds into your diet.
While the sugar content means it should be enjoyed in moderation, using homemade jelly allows you to control the sweetness and avoid artificial preservatives.
FAQs
Many first-time jelly makers wonder if frozen berries will work?
Absolutely! In fact, frozen berries often make excellent jelly as they’re typically picked at peak ripeness. If your jelly hasn’t set properly after 24 hours, don’t worry. You can remake it by bringing it back to a boil with a little additional pectin.
How do I make homemade blueberry jelly without pectin?
To make homemade blueberry jelly without pectin, you only need fresh or frozen blueberries, sugar, and lemon juice. Cook the blueberries on medium heat until they release their juices.
Strain the mixture to remove solids, then simmer the juice with sugar and lemon until it thickens. The natural pectin in the blueberries and lemon juice will help it set.
Can I use frozen blueberries to make jelly?
Yes, you can absolutely use frozen blueberries to make jelly! Thaw them completely before cooking, and remember that frozen berries might release more juice than fresh ones, making your jelly more flavorful.
How long does homemade blueberry jelly last?
If properly canned and stored in a cool, dark place, homemade blueberry jelly can last up to 12 months. Once opened, store it in the fridge and use it within 2 to 3 weeks for the best taste.
Why is my blueberry jelly not setting?
Blueberry jelly may not set if the cooking time was too short or if the ratio of sugar to fruit was off. Ensure you boil the mixture long enough to reach the gel point (220°F or 104°C).
Adding lemon juice helps activate natural pectin, improving the set.
What can I do with blueberry jelly besides spreading it on toast?
Blueberry jelly is versatile! You can use it as a topping for pancakes, waffles, or ice cream. It works well as a glaze for meats or mixed into yogurt and smoothies. It can even be used as a pastry filling.
Conclusion…
Making blueberry jelly is more than following a recipe it’s about creating something truly special with your own hands. Each batch tells a story, whether it’s made from berries picked on a summer morning or preserved from your farmer’s market haul.
I encourage you to try this recipe and make it your own. There’s nothing quite like sharing a jar of homemade blueberry jelly with friends and family, knowing that you’ve captured a bit of summer’s sweetness to enjoy throughout the year.
Remember, like any craft, jelly-making gets better with practice. Don’t be discouraged if your first batch isn’t perfect each time you make it, you’ll learn something new about the process.
Share your experiences, adapt the recipe to your taste, and most importantly, enjoy the sweet rewards of your efforts.